Configuration
Creating a ROCCA module
From the File > Add Modules > Detectors menu, select “ROCCA”. Enter a descriptive name for the new module and press OK.
ROCCA requires an FFT engine module to operate. If no FFT engine module has been loaded, PAMGuard will warn the user and automatically load one.
When the ROCCA module is created, it will automatically try to load a classifier model. ROCCA will also check to see if an Enounter Stats file exists. If it does, the user is given the option to load the contents of the file into memory.
Note: the Encounter Stats file is continually overwritten while ROCCA is running. If, upon startup, the user does not load the data into memory, the information in the file will be lost. Thus if the user does not wish to load the data but still desires to keep it, the file should be renamed before continuing with PAMGuard.
Configuring a ROCCA module
Note: the Sound Acquisition and FFT Engine modules must be configured before configuring ROCCA.
From the Detection menu, select “ROCCA Parameters”. A new dialog should appear containing five tabs: Source Data, Contours/Classifier, Output, Filename Template, and Notes.
Source Data tab
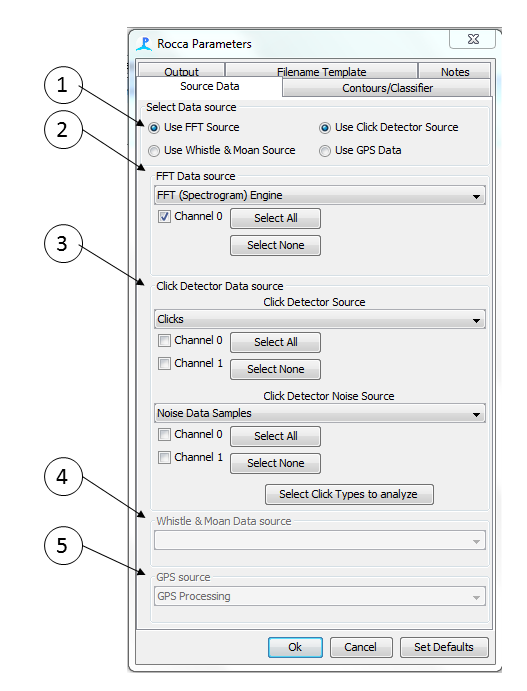
Data Source: where ROCCA should get it’s input data from. Options include an FFT module (select this if using the manual classifier), a Click Detector, and a Whistle and Moan Detector. Multiple sources can be selected. The whistle and moan detector and/or click detector should be selected if using the automated classifier.
FFT Data source: the fft data source to be used. The channels listed are those currently selected in the FFT Parameters dialog. ROCCA will save a wav file clip of each manually selected whistle contour whenever it is classified and added to the current encounter. Check the channel boxes corresponding to the channels you wish to save to this clip wav file. Note that this is different than the channels displayed in the spectrogram window, which are set in the display options dialog. Whistles can be selected and contours extracted from any channel displayed, but the saved whistle clips will only contain data from the channels selected in the FFT data source box. So it is possible (though not recommended) to extract and classify a whistle from Channel 0, but only save the data from Channels 1 and 2.
Click Detector source: the Click Detector to be used. Both the click source and the noise source must be specified, along with the appropriate channels. There are two options for the click source: Clicks and Tracked Clicks. Selecting Clicks sends all auto-detected clicks to the ROCCA module. Selecting Tracked Clicks sends only those clicks which are assigned to click trains (see Click Train Identification and Click Detector displays for more details) to ROCCA. The ‘Select Click Types’ button allows the user to select which types of clicks (as classified by the Click Detector module based on user-supplied settings) to send from the Click Detector to ROCCA for analysis.
Noise Data Samples should be selected for the Click Detector Noise Source. These noise data samples are automatically collected by the Click Detector module at intervals which can be set by the user in the Click Detector Settings dialog window. The noise samples are used to calculate the RMSNOISE and SNR click variables
Note: a Click Detector Module must first be configured and at least one Click Classifier defined, for appropriate options to be displayed in the Click Detector Data Source frame. See the PAMGuard help files for full details on creating and configuring the Click Detector module.
Whistle and Moan source: the Whistle & Moan Detector to be used. This drop-down box will list all currently configured Whistle & Moan Detector modules. After performing its own analysis, the Whistle & Moan Detector will send all detected whistles to the ROCCA module. ROCCA will then measure contour variables, classify the whistles, add the results to the sidebar and save the results to output files, but no popup Spectrogram window will appear.
Note: a Whistle & Moan Detector Module must first be added and configured for appropriate options to be displayed in the Whistle & Moan Data Source frame. See the PAMGuard help files for full details on creating and configuring the Whistle & Moan Detector module.
GPS Source: the source for GPS signals. Some encounter classifiers use latitude and longitude as classification variables.
Contour/Classifier tab
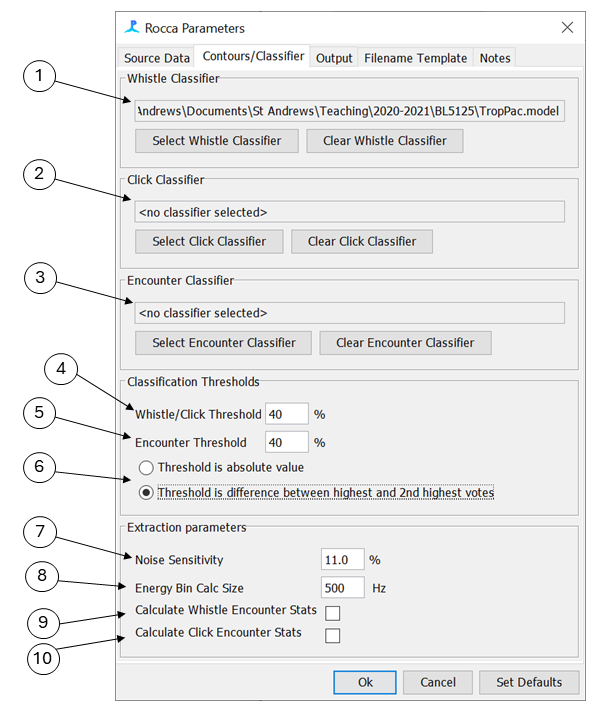
Whistle Classifier: select the classifier to be used for whistles. The available classifier models were created based on the Weka Random Forest model. A classifier model uses the file extension .model. To select a classifier model, click the Select Whistle Classifier button. To not classify whistles at all, click the Clear Whistle Classifier button. At the moment the ability to create new classifiers within PAMGuard is not available.
Click Classifier: select the classifier to be used for clicks. The available classifier models were created based on the Weka Random Forest model. A classifier model uses the file extension .model. To select a classifier model, click the Select Click Classifier button. To not classify clicks at all, click the Clear Click Classifier button. At the moment the ability to create new classifiers within PAMGuard is not available.
Encounter Classifier: select the classifier to be used for acoustic encounters. Classifier models are created based on the Weka Random Forest model. A classifier model uses the file extension .model. To select a classifier model, click the Select Encounter Classifier button. To not classify encounters at all, click the Clear Encounter Classifier button. At the moment the ability to create new classifiers within PAMGuard is not available.
Whistle/Click Threshold: the threshold value to use when classifying individual whistles or clicks. If the percent of trees voting for the predicted species in the random forest falls below this threshold, the whistle or click is considered non-classifiable and is labelled as �ambiguous�.
Encounter Threshold: the threshold value to use when classifying encounters. If the percent of trees voting for the predicted species in the random forest falls below this threshold, the encounter is considered non-classifiable and is labelled as �ambiguous�.
The whistle/click threshold can be used in one of two ways: as an absolute value, or as the minimum difference between the highest vote and the second-highest vote. If used as an absolute, whistles will only be classified if the percent of trees in the random forest voting for the predicted species is higher than the selected threshold. If used as a difference, whistles will only be classified if the highest percentage of trees in the random forest voting for the predicted species is greater than the second-highest percentage by the threshold value.
Noise Sensitivity: specify the global noise sensitivity parameter to use when extracting a whistle contour.
Energy Bin Calc Size: specify the size of the frequency bin used to calculate the energy around each peak frequency.
Calculate Whistle Encounter Stats:select whether or not to calculate ancillary variables for the detected whistles, for use by the Encounter Classifier. Calculations may cause memory issues when there are many (>1000) whistles.
Calculate Click School Stats:select whether or not to calculate ancillary variables for the detected clicks, for use by the Encounter Classifier. Calculations may cause memory issues when there are many (>1000) clicks.
Note that the Whistle, Click and Encounter classifiers selected by the user should all have been trained with the same species list in order to be compatible with each other.
Note also that if either whistle or click encounter stats are not calculated, the encounter classification will be based on whistle or click classification results only. The number of trees that voted for each species will be tallied over all whistles and clicks in the encounter and the encounter will be classified as the species with the highest number of random forest tree votes. Even if an encounter classifier has been loaded, it will be ignored.
Output tab
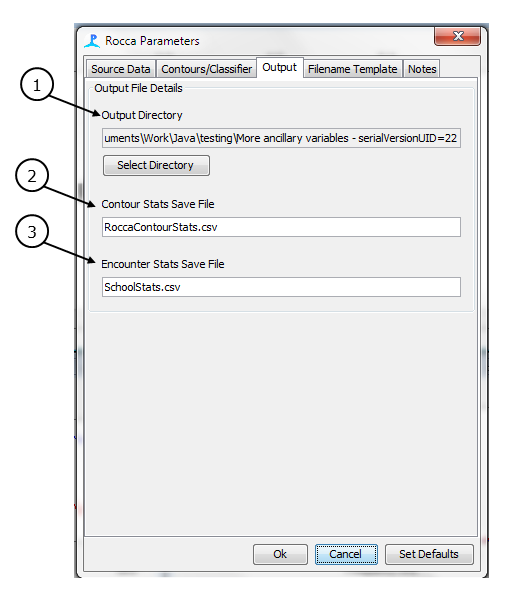
Output Directory: specify which directory clip wav files, whistle contour points and whistle contour variable measurements are saved to. Note that, with Microsoft Windows operating systems, it is a good idea to select a directory that does not require administrator privileges to save to.
Contour Stats Save File: specify the name of the file that classified whistle contour variables are saved to. The file will be saved to the output directory, specified above. Each classified whistle is appended to the end of the file when one of the Save buttons in the Spectrogram Popup window is clicked.
Encounter Stats Save File: specify the name of the file that encounter classifications are saved to. The file will be saved to the output directory, specified above. Note that in order to use the latest encounter numbers, this file is overwritten during each save. While this is not a problem as long as PAMGuard is run continuously, if this file exists when PAMGuard is first loaded the contents will be lost. If the file exists during start up, the user is warned and given a chance to load/rename/backup the existing file.
Filename Template tab
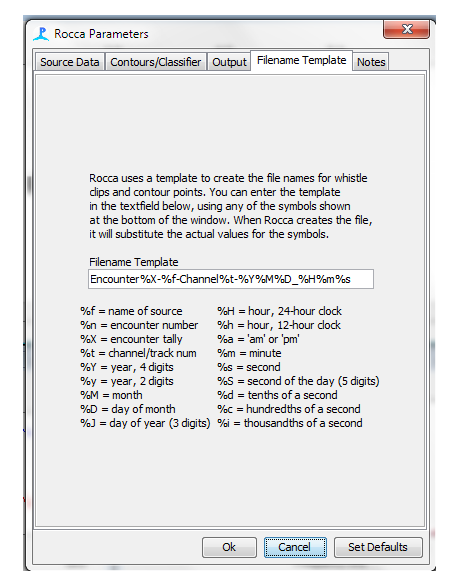
In addition to the Contour Stats and Encounter Stats save files, ROCCA also saves a whistle clip (wav format) and a list of the contour points (time and frequency, csv format). These files will be named according to the template given in the text box on this tab. As part of the name, the user is able to use any of the following symbols. When the files are saved, ROCCA will substitute the actual values for the symbol names.
| Symbol | Meaning | Symbol | Meaning | |
|---|---|---|---|---|
| f | name of source | H | hour, 24-hour clock | |
| n | detection number | h | hour, 12-hour clock | |
| X | detection tally/count | a | am or pm | |
| t | channel/track number | m | minute | |
| Y | year, 4 digits | s | second | |
| y | year, 2 digits | S | second of the day, 5 digits | |
| M | month | d | tenths of a second | |
| D | day of the month | c | hundredths of a second | |
| J | day of the year, 3 digits | i | thousandths of a second |
Note that all date/time values are GMT.
Notes tab
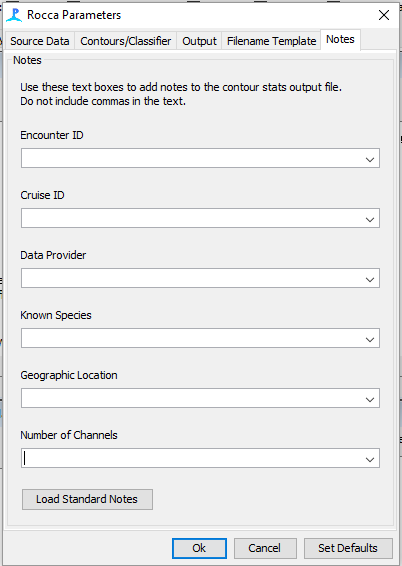
This tab provides the user an opportunity to save additional information about the data. Any number of text boxes can be used. The information contained in the text boxes will be saved on every row of the Contour Parameters file. In addition, a text file containing standard notes can be loaded. The contents of the text file will then be available in a drop-down list for each text box. The format of the text file is one note per line.
Note: commas cannot be used in the text boxes or the standard notes text file.
ROCCA Mark Observers
ROCCA must be added to the Mark Observers list in the spectrogram in order to receive captured data. To do so, right click on the spectrogram and select Settings. Select the Mark Observers tab and check the box beside ROCCA. If ROCCA is not listed as a possible mark observer, it has not been added as a module.