GPL Detector Configuration
Before creating a GPL module, you will need a Sound Acquisition module and an FFT (Spectrogram) Engine. If these do not already exist you will be prompted to create them when you add the GPL Module. In the File Menu, go to Detectors / Generalised Power Law Detector and the module will be added to your PAMGuard configuration.
Note that the GPL detector is most useful for the detection of low frequency baleen whale sounds. If your raw data are high frequency, then consider adding a Decimator module between the Sound Acquisition and FFT modules to lower the frequency of the data.
FFT Data source
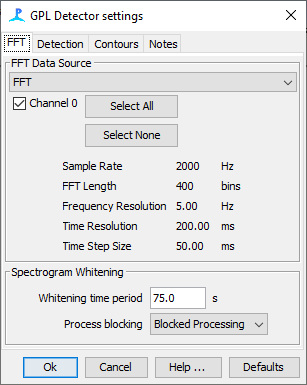
Open the GPL detector dialog from the main Settings menu and select the FFT data source and indicate which channels you want the detector to operate on. The detector will operate independently on each selected channel.
Note the frequency and time resolutions of the FFT data which are displayed in the dialog. If these are not suitable, then make adjustments in the FFT module before returning to the GPL configuration.

Spectrogram Whitening
The GPL detector uses advanced signal processing methods to estimate a median background noise which is then subtracted from the data. The Whitening Time Period is the time over which this background is measured. When processing starts, it can take up to two of these whitening periods for the initial background measurement to stabilise. For this reason, data are often processed in blocks, so the software can scan back and forth within the same block of data to make the background measurement, then search for detections.

Blocked Processing
In this mode, data are read in in blocks of the length of the whitening period, the background is measured on that block of data, and then detections made within the same block. This works well for offline processing of duty cycled recordings. However, when processing data in real time, no detections will be visible to the user until the end of each block, and the detections may scroll off the screen before you’ve had a chance to look at them!
Block First
In this mode, the first block of data is processed exactly as for Blocked Processing. After that, the system then switches to continuous processing, where the background is continually updated based on the data within the preceding whitening period. After the initial block, this provides smoother displays than Blocked Processing. Output should be very similar, however the background measurement at a moment in time will be slightly different, so results may vary slightly. This mode could be used either for real time processing or for offline processing of recorded data.
Block First
In this mode, there is no blocking of data and all background assessments are made on preceding data. This mode is therefore NOT suitable for offline processing of recordings, since detection will not be possible within the first two whitening time periods of each file. However, for long term real time monitoring, if you’re not too fussed about the first minutes of data, it would be possible to use this processing mode.