Using the Spectrogram
The spectrogram display serves several purposes. Firstly it provides a visual check that the DIFAR signal is being received correctly. Secondly it allows the operator to manually mark out sounds they want to be processed with the DIFAR system. Lastly, it provides visual indication of the detections and classifications that are in the DIFAR Queue and/or have been processed.

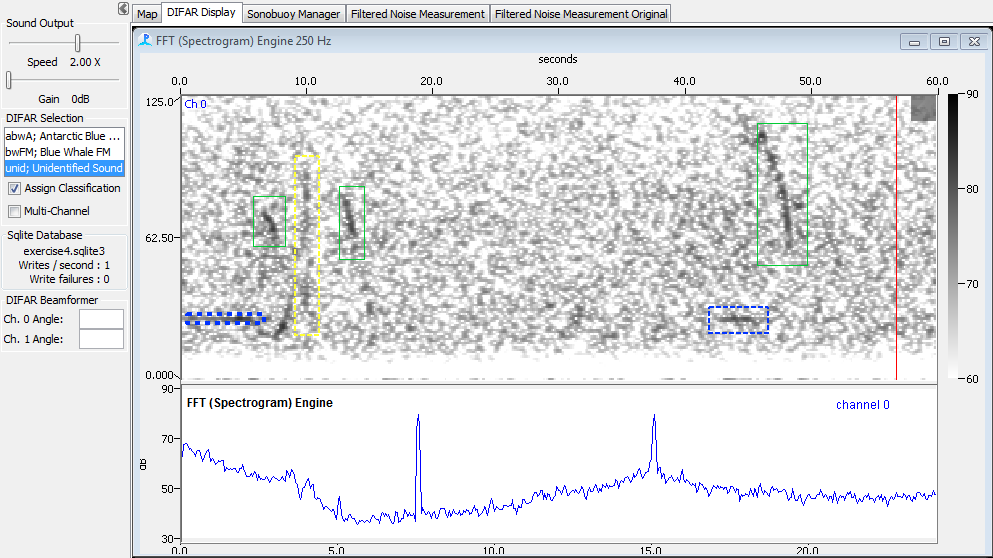
The figure shows a typical spectrogram display using one DIFAR sensors. The spectrogram is displaying the low frequency FFT data, with a bandwidth of 0 to 125 Hz. The lower panel is showing the instantaneous spectra from the 48kHz data. In this lower panel clear spectral peaks are visible at 7.5kHz and at 15kHz. These are the carrier frequencies for the frequency modulated signal from the DIFAR buoy. If these peaks are not clearly visible, then it�s likely that the DIFAR buoy is out of range or there is a problem with your receiving system.
There are also broader �humps� in the bottom panel which represent the multiplexed signals from the three acoustic sensors. The hump between 0 and about 4 kHz is the spectrum of data received on the omnidirectional hydrophone. This is broadly similar in shape to the humps either side of the 15kHz carrier which are the signals on the two directional sensors.
To mark a sound simply place the mouse on the spectrogram at the start of a sound and drag to the end of a sound. While you are dragging, other marks on the spectrogram will temporarily disappear. While dragging, the mark will also appear on every channel, although only the channel you are marking will be used in DIFAR processing.
If marks do not appear on the spectrogram display the most likely cause is that the mark observers on the spectrogram display have not been correctly configured. Once a sound has been marked on the spectrogram it will be sent to the DIFAR queue.
On the spectrogram itself, sounds that are in the DIFAR Queue will be indicated with a black rectangle with a dashed line corresponding to the mark. Sounds that have been assigned a classification will appear as colored marks corresponding to the color assigned to that classification. A solid line around a clip indicates that those sounds that have been processed and saved and are no longer in the DIFAR Queue.
DIFAR Side-panel
The DIFAR Selection side-panel can be used to combine the process of manually marking of sounds and assigning classifications. When the Assign classification checkbox is checked, the highlighted classification will be automatically applied to newly created clips. When combined with the option to Auto-process classified clips, this will further streamline operation and reduce the need to interact with the DIFAR queue. This mode of operation is especially streamlined when there are only a few different classifications are present in a recording.
When checked, the Multi-Channel checkbox will apply classifications and create individual DIFAR clips from each of the audio channels in a given Raw Data source. When unchecked (the default option), a clip will be created only for the marked channel. Multi-Channel is typically the most useful when sonobuoys have been deployed very close to each-other.