Configuration
From the File>Add modules>Sensors menu, or from the pop-up menu on the data model display select ‘Array Accelerometer’. Enter a name for the new module and press Ok.
The accelerometer module is not dependent on any other modules and will automatically find and exchange information with the Hydrophone Array Manager.
Configuring an Array Accelerometer Module
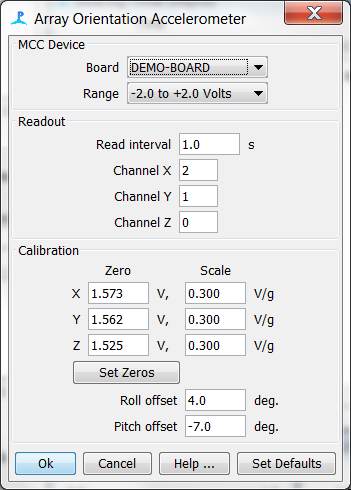
Go to Settings>Array Accelerometer… and the following dialog will appear.

The dialog is divided into three sections
MCC Device
In this section you will find a drop down list of installed MeasurementComputing devices. If you can’t see your device here, refer to the MCC documentation on how to install it
Select the smallest voltage range that can cover the range out output values expected from the sensor (generally +/- 2V)
Readout
Enter the readout interval in seconds. The accelerometer should not be read at a rate > once per second.
Select the channels of the MCC device which you wish to read for each of the x,y and z accelerometers.
Roll is measured from the x and z accelerometers, Pitch is measured from all three. If you only wish to read roll, there is no need to read out the y axis, in which case you can enter -1 for this channel number.
Calibration
Enter the calibration values for each channel. Generally the Zero offset voltage is half the power supply voltage and the scales (Volts per g) should be the values from the accelerometer data sheet.
With the accelerometer on the horizontal, it is possible to automatically set the zero offsets by pressing the ‘Set Zeros’ button.
If the module has not been mounted square within the hydrophone frame, you may also enter offset values which will be added to the measured pitch and roll