Envelope Tracing
This module allows you to drop the frequency of ultrasonic transient sounds into the audio band.
For example, if you’ve a high speed acquisition card set up to detect harbour porpoises, you won’t be able to hear them because the sounds are several octaves too high for human hearing and you won’t be able to play the sounds back over your sound card because the sound card won’t support those high sample rates
Envelope tracing takes place in four distinct stages:
1. High frequency data are band pass filters. This allows you to select only the parts of the spectrum that you’re interested in.
2. The high frequency data are rectified (i.e. all negative values are made positive).
3. The data are smoothed using a low pass filter.
4. The data are decimated to a lower frequency.
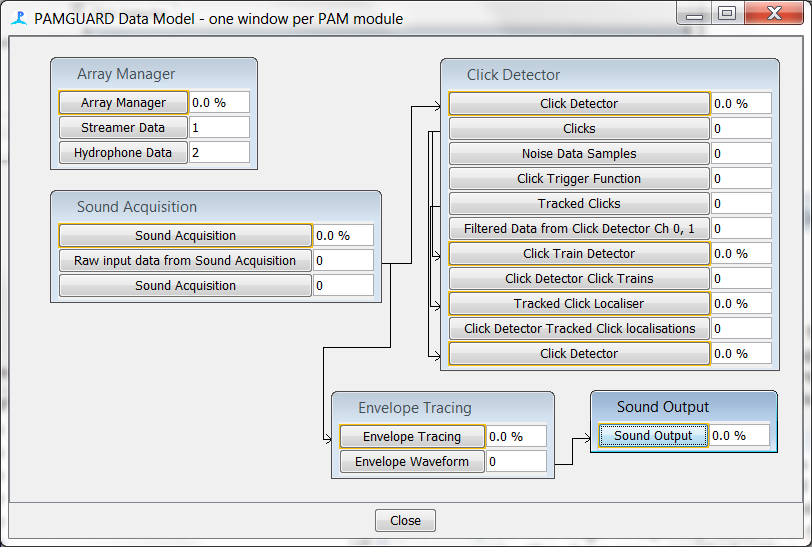
In the configuration below, high frequency data are going to a click detector and also via the envelope tracer to a sound output module. The output sample rate of the Envelope Tracer is set to 48kHz, which can be played back easily using a PC sound system

Creating the module
From the File>Add modules>Sound Processing menu, or from the pop-up menu on the data model display select “Sound Processing> Envelope Tracing”. Enter a name for the new module and press Ok.
Configuring the module
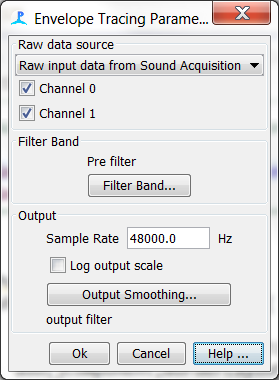
To configure the module, open the settings dialog from the Detection>“your module name” menu:

Raw Data Source
Select a source of Raw data. This will generally be a Sound Acquisition module. Check the channels you want to envelope trace on.
Filter Band
Select the filter band you want to apply before the envelope tracing. This should generally be matched to the sounds you are most interested in.
Output
Set the output sample rate and smoothing filter. The output filter should generally be a low pass filter with a cut off frequency at around half the output frequency.