Sound Recorder Configuration
The Sound Recorder display configuration dialog is accessed from the Settings button on the recorder display panel or from the Detection>Sound Recorder>Recorder Settings menu command.

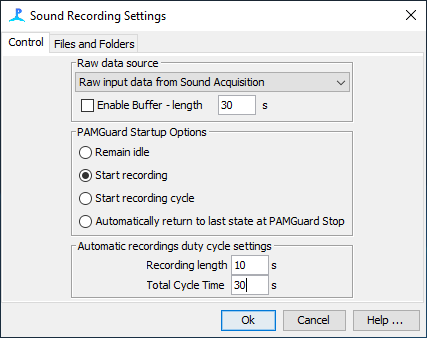
Raw Data Source
Select the data source for the sound recorder. All sources of raw audio data within PAMGuard will be listed.
Enable Buffer
Enter the length of the history buffer that will be added to the start of recordings started by pressing the Continuous + Buffer button.
Note that buffering audio data can take a lot of memory and that writing large data buffers at the start of a file can take considerable time, which may make PAMGuard unstable. Buffers of up to a minute in length at sample rates of 100 kHz are generally Ok.
PAMGuard Startup Options
These options control how the Sound Recorder will behave when PAMGuard starts:
Remain Idle
The sound recorder will remain idle when PAMGuard starts.
Start recording
The sound recorder will start continuous recording as soon as PAMGuard starts acquiring audio data.
Start recording cycle
The sound recorder will start it’s recording cycle (see below) as soon as PAMGuard starts acquiring audio data.
Automatically return to last state at PAMGuard Stop
The sound recorder will go back into whatever state (stopped, recording, cycled recording) it was in when PAMGuard last stopped.
Automatic Recordings
Set the length of automatic recordings in seconds, as well as the time from the start of one recording to the start of the next (i.e. the duty cycle, including both recording and non-recording times). In the image above, PAMGuard would record for 10 seconds and then stop recording for 20 seconds before starting to record again.
Files and Folders

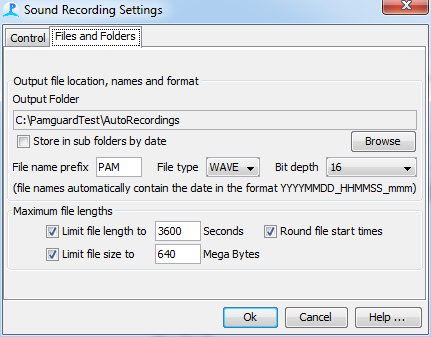
Select Output Folder
Select the folder that recorded files will be stored in. Note that recordings can take a considerable amount of space, so it may be worth having a dedicated drive for this purpose.
Output file location, name and format
File names are always based on the current PC clock date (which should have been set from the GPS). You may also enter a character string to the start of the file. In the example shown, a recording started at 22:51:40 on 12 January 2007 would have the name PAM20070112_225140_456.wav, where the last three digits are milliseconds. There is an option to have files written to separate sub folders of the root directory, a new folder being created each day.
WAVE (WAV), AU and AIFF (AIF) formats are currently supported with bit depths of either 16 or 24. The bit depth should ideally match the bit depth of the sound acquisition system. Most acquisition systems are 16 bit. Exceptions are some audio files and some ASIO sound cards. Note that while the bit depth is correctly read from sound files, it is not possible to read the bit depth from ASIO devices so they will report a bit depth of 24 bits even if they are only reading 16. you should consult the devices manual to check for yourself.
Maximum File Lengths
Set the maximum length of single files either as a length in seconds and / or a size in Megabytes. Although you are likely to store files on hard drives, it is generally sensible to limit the size of single files such that a single file will fit on a writable CD or DVD. Never let files become larger than 2 Gigabytes since some systems will be unable to read them. (In principle the maximum size of a WAV file is 4 Gigabytes, however we have found that some software will be unable to read files larger 2 Gigabytes).
Round file start times
Wherever possible file start times will be controlled to start on hour / 10 minute boundaries, etc.