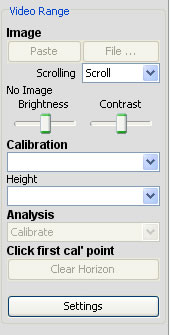
Side Panel
Creating a Video Range Module
From the File>Add Modules>Visual Methods menu, or from the pop-up menu on the data model display select “Video Range”. Enter a name for the module(e.g. big eye video, 7x50 video, etc) and press Ok.
This will create a new side panel which contains access to the controls required to use the video range module.

Two Image buttons allow an image, stored as a file or on the clipboard, to be opened.
The Scrolling dialog provides options for how PAMGuard should handle images that are larger than the display window
Scroll, allows the user to scroll around the image using the image-viewer scroll bars.
Crop, crops the image to the size of the window
Shrink, shrinks the image to the window size while maintaining its aspect ratio
Brightness and Contrast slide bars allow adjustment of these parameters in the image
Calibration allows a preset calibration factor to be chosen, any number of these can been stored. Calibration factors are used to convert distances between points on the image, measured in pixels, to angles subtended at the camera lens.
Height allows a predetermined camera height above sea level to be chosen. (Any number of these can be stored)
Analysis provides a choice between different types of analysis: either, calibration or one of two range measurement methods.
Clear Horizon allows the horizon to be replotted during range measurement.
Settings allows various aspects of the program to be configured.
It is usually necessary to configure the program using options on the Side Bar and the Settings tabs, especially if its the first time program has been used.
Typically the first step is to calculate a Calibration factor.
(However, if a calibration factor is already available jump to Range Measurement.)